

How To Remove Liquid From Lightning Connector


-
Power off your iPhone before beginning disassembly.
-
Remove the two half dozen.seven mm-long pentalobe screws at the bottom edge of the iPhone.


-
If your iPhone has a cracked screen, proceed further breakage contained and forestall bodily impairment during your repair by taping over the glass.
-
Lay overlapping strips of packing tape over the iPhone's display until the whole confront is covered.
-
If the broken glass makes it hard to go a suction cup to stick in the next few steps, effort folding a stiff piece of tape (such as duct tape) into a handle and lifting the display with that instead.

-
Use a hairdryer or heat gun, or ready an iOpener and utilise it to the lower edge of the iPhone for nigh a minute in gild to soften up the adhesive underneath.


-
If the plastic depth gauge is attached at the middle of the iSclack, remove it now—it'southward not needed for larger phones like the iPhone XR.
-
Position the suction cups about the bottom edge of the iPhone—one on the front end, and one on the back.
-
Printing both suction cups firmly into place.


-
Agree onto your iPhone securely and shut the handle of the iSclack to slightly split up the screen from the rear case of the phone.
-
Insert an opening pick into the gap under the display on the lower edge of the iPhone.
-
Skip the next two steps and continue to step 8.


-
If you're using a single suction handle, apply information technology to the bottom edge of the phone, while avoiding the curved portion of the drinking glass.


-
Pull up on the suction cup with firm, constant pressure to create a slight gap between the front panel and rear example.
-
Insert an opening option into the gap.


-
Slide the opening pick effectually the lower left corner and up the left edge of the iPhone, slicing through the agglutinative belongings the display in place.


-
Re-insert your pick at the bottom edge of the iPhone, and slide it up the right side to continue separating the adhesive.


-
Slide the opening option around the top corner of the display, while gently pulling or wiggling the brandish down in the direction of the Lightning port.
-
Slide the pick to the opposite corner and cut any remaining adhesive securing the display.

-
Pull on the small nub on the suction cup to remove it from the front panel.
-
If you used an iSclack and it'southward still affixed to the iPhone, remove it now.


-
Open the iPhone past swinging the display up from the left side, similar the back cover of a volume.
-
Lean the display against something to keep it propped upwardly while you're working on the telephone.


-
Remove iii 1.2 mm Y000 screws securing the bombardment connector cover bracket.
-
Remove the bracket.


-
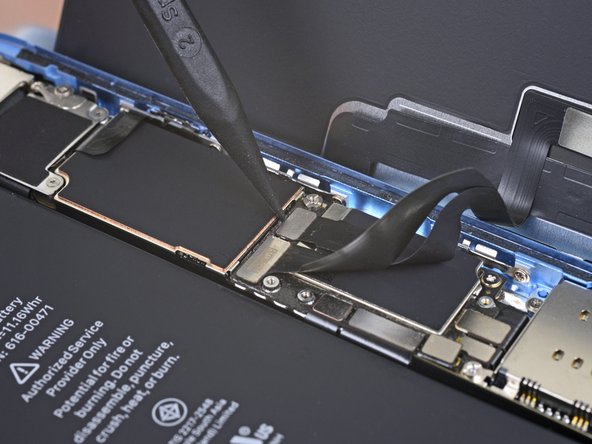
Use the point of a spudger to pry the bombardment connector straight up out of its socket.
-
Bend the connector slightly away from the logic board to prevent information technology from accidentally making contact with the socket and providing power to the phone during your repair.


-
Remove the two 1.ii mm Y000 screws securing the display connector bracket.
-
Remove the bracket.

-
Apply the tip of a spudger to pry upwards and disconnect the digitizer cable.


-
Use the tip of a spudger to disconnect the display cablevision connector.

-
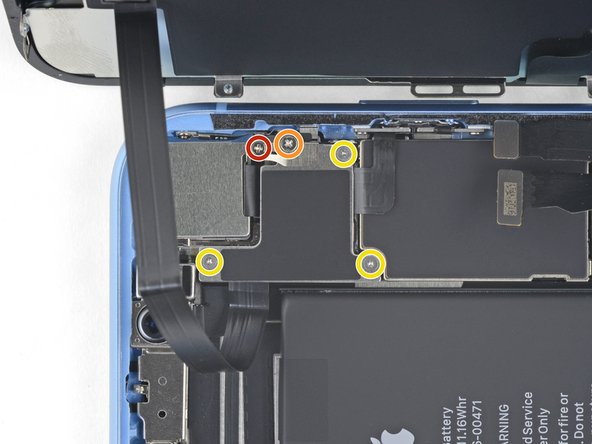
Remove the five screws securing the logic board connector bracket to the rear case:
-
One i.3 mm Phillips #000 screw
-
Ane 1.5 mm Phillips #000 screw
-
Three 1.ii mm Y000 screws
-
Remove the bracket.


-
Employ the tip of a spudger to pry the front sensor assembly connector up from its socket.

-
Remove the display assembly.

-
Remove the iv screws securing the speaker/sensor assembly to the back of the display:
-
Two ane.6 mm Phillips screws
-
Ane 2.3 mm Phillips spiral
-
1 1.two mm Y000 spiral


-
Using tweezers, gently flip the speaker assembly over—down and away from the top edge of the display.

-
Use a hairdryer, a rut gun, or a heated iOpener practical to the top front of the display for about a infinitesimal, in order to soften the adhesive securing the sensors.


-
Carefully slide the flat edge of a spudger underneath the flex cable below the microphone.
-
Twist gently to split the microphone, while existence careful non to strain or damage the flex cable.
-
If needed, apply the signal of the spudger to finish separating the microphone from its notch in the front panel. If the microphone remains difficult to split up, utilize more than heat.


-
Working left to correct, slide an opening pick beneath the flex cable and underneath the proximity sensor + flood illuminator module.
-
Gently wiggle and elevator to split the module from its notch in the front panel.


-
Use tweezers to slide the small subclass straight upwardly and off of the ambient light sensor.


-
Utilise tweezers to jerk the ambience light sensor and elevator it from its notch in the brandish.


-
If y'all successfully removed the entire ambient calorie-free sensor, equally shown in the first photo, keep to the next step below.
-
If the white diffuser strip is detached and remains embedded in the display, as shown in the second photo, you will demand to advisedly lever information technology out along the top border using a thin blade or pry tool. Re-applying estrus first may make this chore a scrap easier.


-
Remove the earpiece speaker and forepart sensor associates.
-
Proximity sensor
-
Flood illuminator
-
The module must be positioned so that these components are not obstructed past whatsoever adhesive.
Source: https://www.ifixit.com/Guide/iPhone+XR+Screen+Replacement/116036
0 Response to "How To Remove Liquid From Lightning Connector"
Post a Comment